

How to bleach at home
How to bleach at home
Bleaching your hair at home can be an exciting way to experiment with a new look or achieve a lighter hair color. However, it’s essential to approach this process with caution and follow the instructions carefully to minimize the risk of damaging your hair or scalp.
This guide will provide you with step-by-step instructions on how to bleach your hair at home, including safety precautions, materials you’ll need, and the actual bleaching process. Whether you’re looking to go for a full blonde transformation or add some highlights, this guide will help you get started on your journey to a new look. Remember that bleaching can be harsh on your hair, so it’s crucial to follow best practices to maintain healthy and beautiful results.
How to bleach at home step by step 8 tips
How to bleach at home step by step 8 tips
Bleaching your hair at home can be a fun way to change your hair color, but it’s important to follow the process carefully to avoid damaging your hair. Here’s a step-by-step guide on how to bleach your hair at home:
Materials you will need:
- Hair bleach kit (contains bleach powder and developer)
- Plastic or glass mixing bowl
- Plastic or rubber gloves
- Applicator brush or comb
- Old T-shirt or towel
- Hair clips or ties
- Plastic shower cap or cling wrap
- Timer
- Neutralizing shampoo and conditioner
- Toner (optional, for achieving specific hair colors)
Safety Precautions:
- Always perform a patch test 48 hours before bleaching to check for allergies or skin sensitivities.
- Protect your skin by wearing gloves and an old T-shirt you don’t mind getting bleach on.
- Ensure the room is well-ventilated to avoid inhaling fumes.
- Never overlap the bleach on already bleached hair to prevent over-processing.
Steps to bleach your hair at home:
1. Prepare your hair:
- Do not wash your hair for a day or two before bleaching, as natural oils can help protect your scalp.
- Detangle your hair with a comb or brush.
- Section your hair using clips or ties for easier application.
2. Prepare the bleach mixture:
- Follow the instructions on the bleach kit to mix the bleach powder and developer in the mixing bowl. Usually, you’ll use one part bleach powder to two parts developer.
- Mix until you have a smooth, creamy consistency.
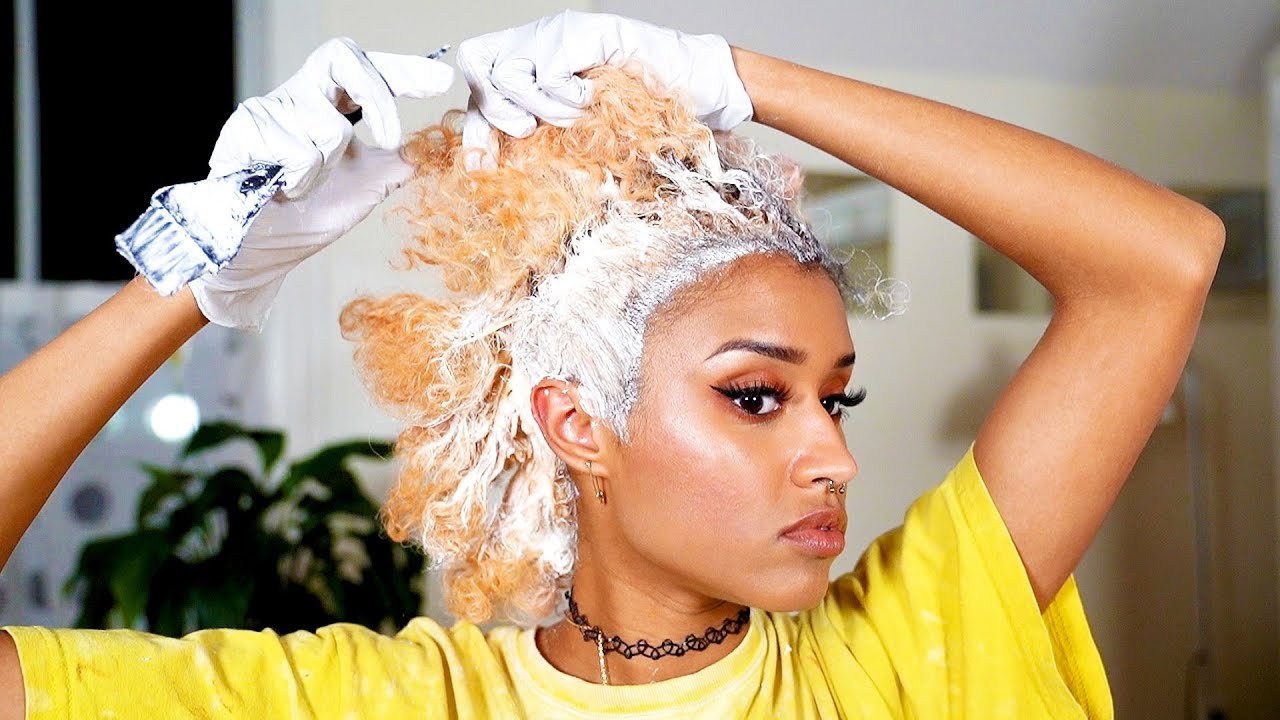
3. Apply the bleach:
- Start applying the bleach to your hair, beginning at the ends and working your way up to the roots.
- Use the applicator brush or comb to distribute the bleach evenly.
- Avoid getting bleach on your scalp as much as possible, as it can be irritating.
4. Processing time:
- Once the bleach is applied, cover your hair with a plastic shower cap or cling wrap.
- Set a timer according to the kit’s instructions. The processing time can vary depending on your hair type and desired level of lightness.
5. Check the progress:
- After about 20 minutes, check your hair’s color by wiping off a small section of bleach with a damp cloth or paper towel.
- If your hair has reached the desired level of lightness, you can proceed to rinse.
6. Rinse and neutralize:
- Rinse your hair thoroughly with lukewarm water to remove all the bleach.
- Shampoo your hair with a neutralizing or clarifying shampoo to stop the bleaching process.
- Condition your hair using a deep conditioner to restore moisture.
7. Optional: Use a toner:
- If your hair has a brassy or uneven tone after bleaching, you can use a toner to correct it. Follow the toner’s instructions carefully.
8. Aftercare:
- Continue to use a moisturizing and color-protecting shampoo and conditioner to maintain your hair’s health and color.
- Avoid excessive heat styling and use heat protectant products when styling your hair.
Remember that bleaching can be harsh on your hair, so it’s crucial to follow best practices to maintain healthy and beautiful results. If you’re uncertain or inexperienced with bleaching, consider seeking professional help to achieve the desired outcome and minimize the risk of damage.
How to bleach at home for dark hair
How to bleach at home for dark hair
Bleaching dark hair at home can be a bit more challenging than light hair because you’ll need to lift and remove more natural pigment. It’s essential to follow the process carefully to avoid damaging your hair. Here’s a step-by-step guide on how to bleach dark hair at home:
Materials you will need:
- Hair bleach kit (contains bleach powder and developer)
- Plastic or glass mixing bowl
- Plastic or rubber gloves
- Applicator brush or comb
- Old T-shirt or towel
- Hair clips or ties
- Plastic shower cap or cling wrap
- Timer
- Neutralizing shampoo and conditioner
- Toner (optional, for achieving specific hair colors)
Safety Precautions:
- Always perform a patch test 48 hours before bleaching to check for allergies or skin sensitivities.
- Protect your skin by wearing gloves and an old T-shirt you don’t mind getting bleach on.
- Ensure the room is well-ventilated to avoid inhaling fumes.
- Never overlap the bleach on already bleached hair to prevent over-processing.
Steps to bleach dark hair at home:
1. Prepare your hair:
- Do not wash your hair for a day or two before bleaching, as natural oils can help protect your scalp.
- Detangle your hair with a comb or brush.
- Section your hair using clips or ties for easier application.
2. Prepare the bleach mixture:
- Follow the instructions on the bleach kit to mix the bleach powder and developer in the mixing bowl. You may need to use a higher-volume developer (30 or 40 volume) for dark hair.
- Mix until you have a smooth, creamy consistency.
3. Apply the bleach:
- Start applying the bleach to your hair, beginning at the ends and working your way up to the roots.
- Use the applicator brush or comb to distribute the bleach evenly.
- Pay special attention to the roots, as they tend to process faster than the rest of the hair.
4. Processing time:
- Dark hair may require a longer processing time than lighter hair. Follow the kit’s instructions, but be prepared for it to take longer.
- Check your hair’s color every 10-15 minutes after the initial 20-30 minutes.
5. Check the progress:
- After each check, wipe off a small section of bleach with a damp cloth or paper towel to monitor the color change.
- When your hair reaches the desired level of lightness or a pale yellow stage, it’s time to rinse.
6. Rinse and neutralize:
- Rinse your hair thoroughly with lukewarm water to remove all the bleach.
- Shampoo your hair with a neutralizing or clarifying shampoo to stop the bleaching process.
- Condition your hair using a deep conditioner to restore moisture.
7. Optional: Use a toner:
- If your hair has a brassy or uneven tone after bleaching, you can use a toner to correct it. Follow the toner’s instructions carefully.
8. Aftercare:
- Continue to use a moisturizing and color-protecting shampoo and conditioner to maintain your hair’s health and color.
- Avoid excessive heat styling and use heat protectant products when styling your hair.
Keep in mind that achieving very light results on dark hair may require multiple bleach sessions, which can be hard on your hair. Be patient and prioritize hair health throughout the process. If you’re uncertain or inexperienced with bleaching, consider seeking professional help to achieve the desired outcome and minimize the risk of damage.
How to bleach hair at home without damage
How to bleach hair at home without damage
Bleaching your hair at home can be done with minimal damage if you follow the proper steps and prioritize hair health throughout the process. Here’s a step-by-step guide on how to bleach your hair at home without causing excessive damage:
Materials you will need:
- Hair bleach kit (contains bleach powder and developer)
- Plastic or glass mixing bowl
- Plastic or rubber gloves
- Applicator brush or comb
- Old T-shirt or towel
- Hair clips or ties
- Plastic shower cap or cling wrap
- Timer
- Neutralizing shampoo and conditioner
- Toner (optional, for achieving specific hair colors)
- Deep conditioner or hair mask
Safety Precautions:
- Always perform a patch test 48 hours before bleaching to check for allergies or skin sensitivities.
- Protect your skin by wearing gloves and an old T-shirt you don’t mind getting bleach on.
- Ensure the room is well-ventilated to avoid inhaling fumes.
- Never overlap the bleach on already bleached hair to prevent over-processing.
Steps to bleach hair at home without damage:
1. Prepare your hair:
- Do not wash your hair for a day or two before bleaching, as natural oils can help protect your scalp.
- Detangle your hair with a comb or brush.
- Section your hair using clips or ties for easier application.
2. Prepare the bleach mixture:
- Follow the instructions on the bleach kit to mix the bleach powder and developer in the mixing bowl. Use a lower-volume developer (20 or 30 volume) to minimize damage.
- Mix until you have a smooth, creamy consistency.
3. Apply the bleach:
- Start applying the bleach to your hair, beginning at the ends and working your way up to the roots.
- Use the applicator brush or comb to distribute the bleach evenly.
- Avoid getting bleach on your scalp as much as possible, as it can be irritating.
4. Processing time:
- Follow the kit’s instructions for the recommended processing time.
- Check your hair’s color every 10-15 minutes after the initial 20-30 minutes.
5. Check the progress:
- After each check, wipe off a small section of bleach with a damp cloth or paper towel to monitor the color change.
- When your hair reaches the desired level of lightness or a pale yellow stage, it’s time to rinse.
6. Rinse and neutralize:
- Rinse your hair thoroughly with lukewarm water to remove all the bleach.
- Shampoo your hair with a neutralizing or clarifying shampoo to stop the bleaching process.
- Condition your hair using a deep conditioner or hair mask to restore moisture. Leave it on for an extended period if needed.
7. Optional: Use a toner:
- If your hair has a brassy or uneven tone after bleaching, you can use a toner to correct it. Follow the toner’s instructions carefully.
8. Aftercare:
- Continue to use a moisturizing and color-protecting shampoo and conditioner to maintain your hair’s health and color.
- Minimize heat styling and use heat protectant products when styling your hair.
- Use hair masks and deep conditioning treatments regularly to keep your hair hydrated and healthy.
9. Maintain your hair: Regular trims can help remove damaged ends, and minimizing further bleaching or chemical treatments will keep your hair in better condition.
By following these steps and being patient with the process, you can bleach your hair at home with less damage. However, keep in mind that any bleaching process carries some risk, so it’s essential to assess your hair’s health and be cautious if it’s already damaged or chemically treated. If you’re unsure or inexperienced, consider consulting a professional stylist for guidance and assistance.
readHow to remove body odor | 13 tips
How to bleach hair at home with household products
How to bleach hair at home with household products
Bleaching your hair at home with household products is not recommended due to the potential risks and damage it can cause. Hair bleach contains specific chemicals designed to lift and lighten hair color safely. Household products are not formulated for hair bleaching and can lead to unpredictable and damaging results. If you’re considering bleaching your hair, it’s best to use a hair bleach kit designed for this purpose, as it’s formulated to minimize damage and ensure more predictable results.
However, if you’re in an emergency situation and need to lighten your hair slightly, you can try a natural method using lemon juice and sunlight. Please be aware that this method is not suitable for dramatic hair color changes and may only result in subtle highlights. Here’s how you can do it:
Materials you will need:
- Fresh lemon juice (about 1/4 to 1/2 cup)
- A spray bottle
- A comb or hairbrush
- Sun exposure (UV rays from the sun)
Steps to lighten hair with lemon juice and sunlight:
1. Prepare the lemon juice:
- Squeeze fresh lemon juice into a spray bottle. You can dilute it with water if it’s too strong.
2. Comb or brush your hair:
- Detangle your hair and make sure it’s free of any products like hair sprays or oils.
3. Apply the lemon juice:
- Spray the lemon juice evenly onto your hair, focusing on the sections you want to lighten.
- You can use your fingers or a comb to distribute the juice through your hair.
4. Sun exposure:
- Go outside in the sun and allow your hair to dry naturally. The UV rays from the sun will help activate the lightening properties of the lemon juice.
- It’s essential to be cautious about prolonged sun exposure to avoid sunburn.
5. Rinse and condition:
- After spending some time in the sun, rinse your hair thoroughly with water.
- Apply a deep conditioner or hair mask to replenish moisture, as lemon juice can be drying.
Please note that the results of this natural method may vary depending on your hair type and color. It’s also not suitable for achieving dramatic changes in hair color. If you want to make significant changes or lighten your hair more effectively, it’s best to use a professional hair bleach kit or consult a stylist who can provide expert advice and minimize the risk of damage.
How to bleach black hair at home
How to bleach black hair at home
Bleaching black hair at home can be a challenging process because you need to lift a significant amount of natural pigment. If you’re not experienced with hair bleaching, consider seeking professional help to achieve the desired result while minimizing the risk of damage. However, if you’re confident in your abilities and choose to proceed at home, follow these steps carefully:
Materials you will need:
- Hair bleach kit (contains bleach powder and developer)
- Plastic or glass mixing bowl
- Plastic or rubber gloves
- Applicator brush or comb
- Old T-shirt or towel
- Hair clips or ties
- Plastic shower cap or cling wrap
- Timer
- Neutralizing shampoo and conditioner
- Toner (optional, for achieving specific hair colors)
- Deep conditioner or hair mask
Safety Precautions:
- Always perform a patch test 48 hours before bleaching to check for allergies or skin sensitivities.
- Protect your skin by wearing gloves and an old T-shirt you don’t mind getting bleach on.
- Ensure the room is well-ventilated to avoid inhaling fumes.
- Never overlap the bleach on already bleached hair to prevent over-processing.
Steps to bleach black hair at home:
1. Prepare your hair:
- Do not wash your hair for a day or two before bleaching, as natural oils can help protect your scalp.
- Detangle your hair with a comb or brush.
- Section your hair using clips or ties for easier application.
2. Prepare the bleach mixture:
- Follow the instructions on the bleach kit to mix the bleach powder and developer in the mixing bowl. Use a higher-volume developer (30 or 40 volume) for black hair.
- Mix until you have a smooth, creamy consistency.
3. Apply the bleach:
- Start applying the bleach to your hair, beginning at the ends and working your way up to the roots.
- Use the applicator brush or comb to distribute the bleach evenly.
- Avoid getting bleach on your scalp as much as possible, as it can be irritating.
4. Processing time:
- Black hair may require a longer processing time than lighter hair. Follow the kit’s instructions, but be prepared for it to take longer.
- Check your hair’s color every 10-15 minutes after the initial 20-30 minutes.
5. Check the progress:
- After each check, wipe off a small section of bleach with a damp cloth or paper towel to monitor the color change.
- When your hair reaches the desired level of lightness or a pale yellow stage, it’s time to rinse.
6. Rinse and neutralize:
- Rinse your hair thoroughly with lukewarm water to remove all the bleach.
- Shampoo your hair with a neutralizing or clarifying shampoo to stop the bleaching process.
- Condition your hair using a deep conditioner or hair mask to restore moisture.
7. Optional: Use a toner:
- If your hair has a brassy or uneven tone after bleaching, you can use a toner to correct it. Follow the toner’s instructions carefully.
8. Aftercare:
- Continue to use a moisturizing and color-protecting shampoo and conditioner to maintain your hair’s health and color.
- Minimize heat styling and use heat protectant products when styling your hair.
- Use hair masks and deep conditioning treatments regularly to keep your hair hydrated and healthy.
Keep in mind that achieving very light results on black hair may require multiple bleach sessions, which can be hard on your hair. Be patient and prioritize hair health throughout the process. If you’re uncertain or inexperienced with bleaching, consider consulting a professional stylist for guidance and assistance.
dos and don’ts of bleaching hair at home
dos and don’ts of bleaching hair at home
Bleaching hair at home can be a cost-effective way to achieve a new look, but it comes with certain risks. To help you achieve the best results while minimizing damage, here are some dos and don’ts for bleaching your hair at home:
Dos:
- Perform a patch test: Always conduct a patch test 48 hours before bleaching to check for allergies or skin sensitivities. Apply a small amount of bleach mixture to a discreet area of your skin and monitor for any adverse reactions.
- Follow the instructions: Carefully read and follow the instructions provided with your hair bleach kit. Each product may have different mixing ratios and processing times.
- Protect your skin and clothing: Wear plastic or rubber gloves to protect your hands, and wear an old T-shirt or towel you don’t mind getting bleach on.
- Section your hair: Divide your hair into sections using hair clips or ties to ensure even application of the bleach.
- Use the right developer volume: Choose the appropriate developer volume based on your starting hair color and desired result. Lower volumes (20-30) are less damaging than higher volumes (40).
- Apply the bleach evenly: Use an applicator brush or comb to distribute the bleach evenly from roots to ends. Avoid overlapping already bleached areas.
- Check the progress: Monitor your hair’s color every 10-15 minutes after the initial processing time to avoid over-processing.
- Rinse with lukewarm water: After the desired level of lightness is achieved, rinse your hair thoroughly with lukewarm water to remove all bleach.
- Use a neutralizing shampoo: Use a neutralizing or clarifying shampoo to stop the bleaching process and help balance the pH of your hair.
- Deep condition: After rinsing, apply a deep conditioner or hair mask to restore moisture and maintain hair health.
Don’ts:
- Don’t bleach previously bleached hair: Avoid overlapping the bleach on areas that have already been bleached, as this can lead to over-processing and damage.
- Don’t rush the process: Follow recommended processing times, and don’t leave the bleach on longer than necessary, as it can cause excessive damage.
- Don’t use household products: Avoid using household items like lemon juice, baking soda, or peroxide to bleach your hair, as they are not formulated for safe and predictable results.
- Don’t skip the patch test: Always perform a patch test to avoid potential allergic reactions or adverse effects on your skin or scalp.
- Don’t use a high-volume developer if not necessary: Using a high-volume developer (e.g., 40) when a lower one (e.g., 20 or 30) will suffice can cause unnecessary damage.
- Don’t neglect hair care: Invest in quality shampoos, conditioners, and treatments formulated for color-treated or bleached hair to maintain its health and vibrancy.
- Don’t use excessive heat styling: Minimize heat styling (e.g., flat irons, curling irons) and always use a heat protectant product when styling to prevent further damage.
- Don’t bleach damaged hair: If your hair is already damaged, avoid bleaching it, as it can worsen the condition. Focus on repairing your hair’s health first.
- Don’t expect instant results: Achieving your desired hair color may require multiple bleach sessions, especially if you’re going from dark to light.
- Don’t hesitate to seek professional help: If you’re uncertain or inexperienced with hair bleaching, it’s best to consult a professional stylist who can help you achieve your desired look with minimal risk of damage.
Remember that hair bleaching carries some inherent risks, and it’s essential to prioritize the health of your hair throughout the process. If you encounter any issues or uncertainties, consider consulting a professional stylist for guidance.
| Dos | Don’ts |
|---|---|
| Perform a patch test. | Skip the patch test. |
| Follow kit instructions. | Disregard the instructions. |
| Protect skin and clothing. | Neglect skin and clothing. |
| Section your hair. | Skip sectioning. |
| Choose the right developer. | Use excessively high volume. |
| Apply bleach evenly. | Overlap on already bleached areas. |
| Check progress regularly. | Leave bleach on too long. |
| Rinse with lukewarm water. | Rinse with hot water. |
| Use a neutralizing shampoo. | Use regular shampoo. |
| Deep condition after bleaching. | Skip conditioning. |
Following these dos and don’ts will help you achieve better results and minimize potential damage when bleaching your hair at home.
Conclusion
How to bleach at home
In conclusion, bleaching your hair at home can be an exciting way to transform your look, but it’s important to approach the process with care and consideration for your hair’s health. Here’s a recap of the key steps and considerations:
Materials you will need:
- Hair bleach kit (with bleach powder and developer)
- Mixing bowl
- Gloves
- Applicator brush or comb
- Old T-shirt or towel
- Hair clips or ties
- Plastic shower cap or cling wrap
- Timer
- Neutralizing shampoo and conditioner
- Toner (optional, for specific colors)
- Deep conditioner or hair mask
Safety Precautions:
- Perform a patch test.
- Protect your skin and clothing.
- Ensure good ventilation.
- Don’t overlap bleach on previously bleached hair.
Steps to bleach hair at home:
- Prepare your hair: Detangle and section your hair, and avoid washing it for a day or two.
- Mix the bleach: Follow the kit instructions to mix the bleach powder and developer into a creamy consistency.
- Apply the bleach: Start at the ends and work your way up to the roots. Use an applicator brush or comb for even application.
- Monitor processing: Check your hair’s color regularly to avoid over-processing.
- Rinse and neutralize: After reaching your desired lightness, rinse thoroughly with lukewarm water, use a neutralizing shampoo, and deep condition.
- Optional toner: Use a toner if needed to correct any brassy tones.
- Aftercare: Use color-protecting products, minimize heat styling, and regularly deep condition your hair.
Remember that achieving your desired hair color may require multiple sessions, especially if you’re making a significant change. Prioritize your hair’s health throughout the process, and don’t hesitate to consult a professional if you’re uncertain or want to minimize the risk of damage. With proper care and attention, you can achieve beautiful results while maintaining the health of your hair.
FAQs
Here are some frequently asked questions (FAQs) about bleaching hair at home, along with their answers:
Q1: Can I bleach my hair at home if it’s already colored or has permanent dye on it?
- A1: It’s possible, but it can be more challenging. You’ll need to take extra precautions and may need to do a color remover process before bleaching. Consult a professional for guidance in such cases.
Q2: How long should I wait between bleaching sessions if I need to bleach my hair more than once?
- A2: It’s best to wait at least two weeks between bleaching sessions to allow your hair to recover and avoid excessive damage.
Q3: Can I bleach my hair if it’s damaged or has split ends?
- A3: It’s not advisable to bleach already damaged hair. Repair your hair’s health first with deep conditioning treatments and regular trims before attempting to bleach it.
Q4: How do I choose the right developer volume for my hair?
- A4: The choice depends on your current hair color and desired result. Generally, use a lower-volume developer (20 or 30) for less damage and a higher-volume developer (30 or 40) for more dramatic lightening.
Q5: What if my hair turns out too brassy or uneven after bleaching?
- A5: You can use a toner to correct unwanted brassiness or uneven tones. Choose a toner that complements your desired hair color.
Q6: Can I bleach my hair if it’s very dark, like black or brown?
- A6: Yes, but bleaching dark hair may require multiple sessions to achieve lighter results. Be patient and prioritize hair health.
Q7: How can I minimize damage when bleaching my hair at home?
- A7: Follow the instructions carefully, use the lowest effective developer volume, and ensure proper aftercare with moisturizing products and minimal heat styling.
Q8: Can I bleach my hair at home if I have sensitive skin or allergies?
- A8: Be cautious if you have sensitive skin or allergies. Perform a patch test at least 48 hours before bleaching to check for adverse reactions. Consult a dermatologist if you have concerns.
Q9: What should I do if my scalp starts to itch or burn during the bleaching process?
- A9: If you experience discomfort, rinse the bleach out immediately with lukewarm water. It’s essential to prioritize your safety and comfort during the process.
Q10: Should I bleach my hair when it’s wet or dry?
- A10: It’s generally recommended to bleach dry hair, as water can dilute the bleach mixture and affect the results. Ensure your hair is completely dry before applying bleach.
These FAQs cover some common questions about bleaching hair at home. Remember that bleaching can be harsh on your hair, so it’s crucial to approach it with caution and prioritize the health of your hair throughout the process. If you have specific concerns or uncertainties, consider consulting a professional stylist for guidance.
https://en.wikipedia.org/wiki/Hair_bleaching
also readHow to get rid of facial hair | 10 effective remedies